High Dynamic Range: How To Take Really Great HDR Photos
High Dynamic Range scene of sunset behind Hindu temple Kolkata.
What is a High Dynamic Range scene and is a HDR workflow the solution you need when photographing under high contrast lighting conditions? What I've learned along my own journey taking HDR photos will give you all the information you’ll need to be able to make really great High Dynamic Range photos when the conditions demand it.
High Dynamic Range photography, also know as HDR photography, is a digital workflow that combines several individual exposures, of different brightnesses, into a new, composite image containing a greater range of tones and details than would otherwise be possible with a single camera exposure.
It’s interesting to think about the kind of photo challenge that commonly faced me back in the days of film based photography. To avoid disappointment and frustration there were just some things you learned not to photograph.
In photography the term High Dynamic Range refers to the brightness range between the darkest and lightest parts of an image. Scenes of high dynamic range, also referred to as high contrast, were particularly difficult to photograph.
Photographing into a very bright background, for example, was the kind of photo challenge you learned to avoid.
A severely backlit subject would photograph black under such circumstances and, unless you were trying to achieve a silhouette, you were in trouble. It was only through experience that you learned not to photography under such conditions and, thereby, increase your success rate.
This was particularly the case with slide (i.e., transparency) film which was known for its inability to retain fine detail in shadows and highlights when used to photograph high contrast scenes.
Backlit and cast in silhouette, Twelve Apostles on the Great Ocean Road.
Under Extreme Contrast Fancy Accessories Won't Always Save You
Under certain circumstances, for instance when photographing a portrait from a relatively close distance, a reflector or fill flash could be used to add light to the backlit subject and, thereby, reducing the contrast between it and the much brighter background.
I would often employ a reflector when photographing portraits on overseas photography adventures. I remember being particularly pleased with the results I achieved reducing contrast during a December/January trip to Myanmar and Laos when bright clear skies are common.
These days a lot of the photojournalistic work I do in Australia requires the use of fill flash to reduce the dynamic range of a scene, particularly when photographing backlit portraits. I’m now well practiced in this technique and can produce very good results without too much trouble.
However, as you can’t see the results from a photo made with fill flash until after you’ve made the image, I find the technique not as satisfying as when I’d employ a reflector.
Regardless of the benefits of a reflector for fill flash or portrait photography, when it comes to photographing landscape or architectural subject matter these techniques are usually inadequate due to the subject’s greater size and distance from the flash or reflector.
The above photo of the iconic Twelve Apostles, photographed in silhouette, is a case in point.
Back in the day if you wanted to retain the beautiful warm color of the sandstone sea stacks, known as the Twelve Apostles, you’d have to photograph the scene under very different light.
That would mean making your photo at a different time of day, a different time of year or under different weather conditions.
While there are always exceptions to the rule, in most cases the backlit scenario I’ve outlined was beyond the following:
The dynamic range of the film in question
The technology of film based cameras
The abilities of the majority of darkroom enthusiasts
Back in the days of film I simply wouldn’t have made the photo at the top of this post. Or, if I did, I’d have waited till the dynamic range of the scene was within the range of my film and darkroom capabilities.
That would have meant waiting until the sun sank behind the temple or, alternatively, returning at the opposite time of day (e.g., sunrise rather than sunset).
Of course, while doing so would have produced a technically more acceptable result, it would not be the exact scene that attracted my attention and motivated me to photograph it.
Despite the extremely high contrast conditions under which I found myself, I did my best to photograph the scene given the capabilities of my camera’s sensor and the technical expertise available to me at the time.
But understanding and accepting what I couldn’t photograph was the kind of knowledge that, towards the end of my time working with film, enabled me to achieve a very high rate of keepers.
I’m talking about routinely achieving 33 our of 36 perfect exposures on every roll of transparency (i.e., slide) film that went through my camera.
That’s right, none of that silly exposure bracketing for me. No sir!
The same is true for digital cameras though, just like film, some cameras handle high dynamic range scenes better than others. My current camera, a Sony A1, manages high contrast scenes far better than previous cameras I’ve owned since making the move to a complete digital workflow back in 2006.
Add to that the power of Adobe Lightroom and Photoshop, and special third party HDR applications, and these kinds of challenging scenes are largely, though not entirely, a thing of the past.
It’s still important to know your own abilities, with the camera and when post processing digital images. Nonetheless, there’s no doubt that the ability to craft beautiful images via a contemporary digital workflow, under a large range of contrast conditions, is part of why we live in what many old school photographers refer to as the greatest time there’s yet been to be a photographer.
HDR photo of an intricately designed stained glass window at Helligenkreuz Abbey.
How To Make Great Photos Under High Contrast Lighting
When it comes to DSLR and Mirrorless cameras, the key factor determining your success when photographing under high contrast lighting scenes is not so much dependent upon your camera.
While some cameras allow you to record scenes with a higher dynamic range than others, the process known as High Dynamic Range (HDR) photography could be the answer for which you’ve been searching.
I’ve written about HDR photography on this site previously. A HDR workflow commonly involves the following:
Making 3 or more images of the same scene at different brightness levels (e.g., -2, MAR, +2) so that a good exposure for shadows, mid tones and highlights will be recorded.
The next step is to combine the best areas of each of these separate exposures into a single, new composite image. This can be achieved via a plugin, built into Photoshop, or through a series of applications such as Lightroom Classic and Luminar Neo.
I photographed this scene of stained glass windows at Helligenkreuz Abbey in Austria. Employing a HDR workflow is what enabled me to retain so much of the fine detail in highlights and all but the darkest shadows in this scene.
If you’d like to know more about incorporating a HDR photography workflow into your own photography take a look at this post I wrote titled Beautiful Sunny Day Pictures. It’s illustrated with beautiful photos from Australia, New Zealand, Denmark and India. I’m sure you’ll find it an interesting read.
Interesting sculptural elements become a study in brightness and contrast.
Understanding Brightness And Contrast In Photography
The word exposure is often used to refer to the brightness of an image.
If it's correctly exposed the sensor has received the correct amount of light.
If an insufficient amount of light reaches the sensor then the image is underexposed.
An overexposed image results from too much light reaching the camera's sensor.
The contrast of a scene is determined by the difference in brightness, or color, between different parts of the scene photographed.
Therefore, when it comes to brightness, the term contrast can be used in relation to either local or global (i.e., overall) differences in brightness within an image.
Backlit fern on Mount Tamborine, Queensland, illustrating the concept of MAR.
What Does MAR Mean?
MAR is an acronym standing for Meter As Read. It’s when the camera’s light meter indicates that the correct about of light will reach the film or sensor.
It’s important to note that, in this regard, cameras are frequently wrong and, as a result, your photo comes out either too light or too dark.
How To Expose Photos Correctly
This is why cameras have an Exposure Compensation button which allows you to compensate for the camera's poor exposure when using either the P, A/AV and S/TV exposure modes.
If, like me, you prefer Manual Exposure, then exposing photos correctly can be achieved by changing either the Shutter Speed or Aperture or, by changing the camera’s sensitivity to light, by altering the ISO.
Black and white autumn portrait showcasing a full tonal range.
What Is Full Tonal Range in Photography?
A classic photographic print, particularly in the days of black and white, film based photography, encapsulated what was known as a full tonal range.
As is evidenced in this image of a young woman in Eltham, an outer suburb of Melbourne, Australia, a full tonal range describes an image that incorporates the full potential tonal scale of the medium in question as follows:
Pure white
Bright highlights with tone, but no texture
Highlights with the subtle texture
Mid tones, including mid gray and steps both lighter and darker than mid gray
Detailed shadows
Shadows with subtle details
Deep shadows with tone, but no details
Black, by which I mean jet black
The reason a full tonal scale was achievable with this image was because I moved my subject into open shade prior to exposing the image in camera. No fill flash or reflector was required as the tonal range of the scene fitted nicely into the capabilities of my camera’s sensor to record a scene with this kind of relatively moderate dynamic range.
But it’s not always possible to lower the dynamic range of a scene by moving your subject into more subdued lighting. That’s particularly the case when you find yourself photographing backlit landscape or architectural scenes.
When photographing under such conditions, without a HDR workflow, it’s beyond most cameras and the skill of most photography enthusiasts to render anything like a full tonal range in the resulting image.
HDR photo of sunset illuminating sky and water, Jokulsarlon Glacier Lagoon, Iceland.
When To Use A HDR Photo Workflow
The primary reason you employ a HDR photo workflow is not because your photos are either too light or dark. It's because the dynamic range (i.e., contrast) within the scene is beyond that which the camera's sensor can cope with.
HDR photography can prevent the loss of important shadow and/or highlight detail that would commonly occur in a single exposure made under high contrast conditions.
Most folks commonly make 3 exposures, at 2-stop increments, as part of their in-camera HDR workflow.
In fact my own HDR photograph workflow often involves 5 or more exposures, but at 1-stop increments. I figure the extra exposures will provide finer graduation in tones in the final image.
That provides me with a 9-stop exposure range, when doing a series of 9 images at 1-stop increments, compared to the relatively limited 5-stop range offered by the Canon 5D Mark II camera I owned a number of years ago.
My current camera, a Sony A1, allows me to make up to 9 photos in 1-stop increments. That was also true for my previous camera, a Sony a7Rii and the one before that, a Nikon D800e camera.
Together with the large file sizes produced by these cameras, this extended amount of individual exposures, able to be made within a HDR photo sequence, was the main reason I purchased the Nikon and my first Sony camera.
In addition the Sony A1 offers a range of other features, including an incredibly high frame rate and significantly improved quality at relatively high ISO, both of which have been critically important in much of the action photography and photojournalistic assignments I’m currently undertaking.
Bringing HDR Photography To A Hindu Temple Near You
When I’m photographing scenes of extreme contrast the extra range of my old Sony a7Rii and my current Sony A1 cameras makes a significant difference to the final result.
If I’d had such a camera when I made the image at the top of this post I would have been able to hold more texture and more subtle variations in color in the setting sun.
As it was the 3 exposures, made via the common -2, MAR, +2 method with my former Canon 5D Mark II, required considerable extra work in Lightroom and Photoshop to produce the image at the very top of this post.
It’s a good result, but I feel the sun is far too light in tonality. It's a shame and it bothers me.
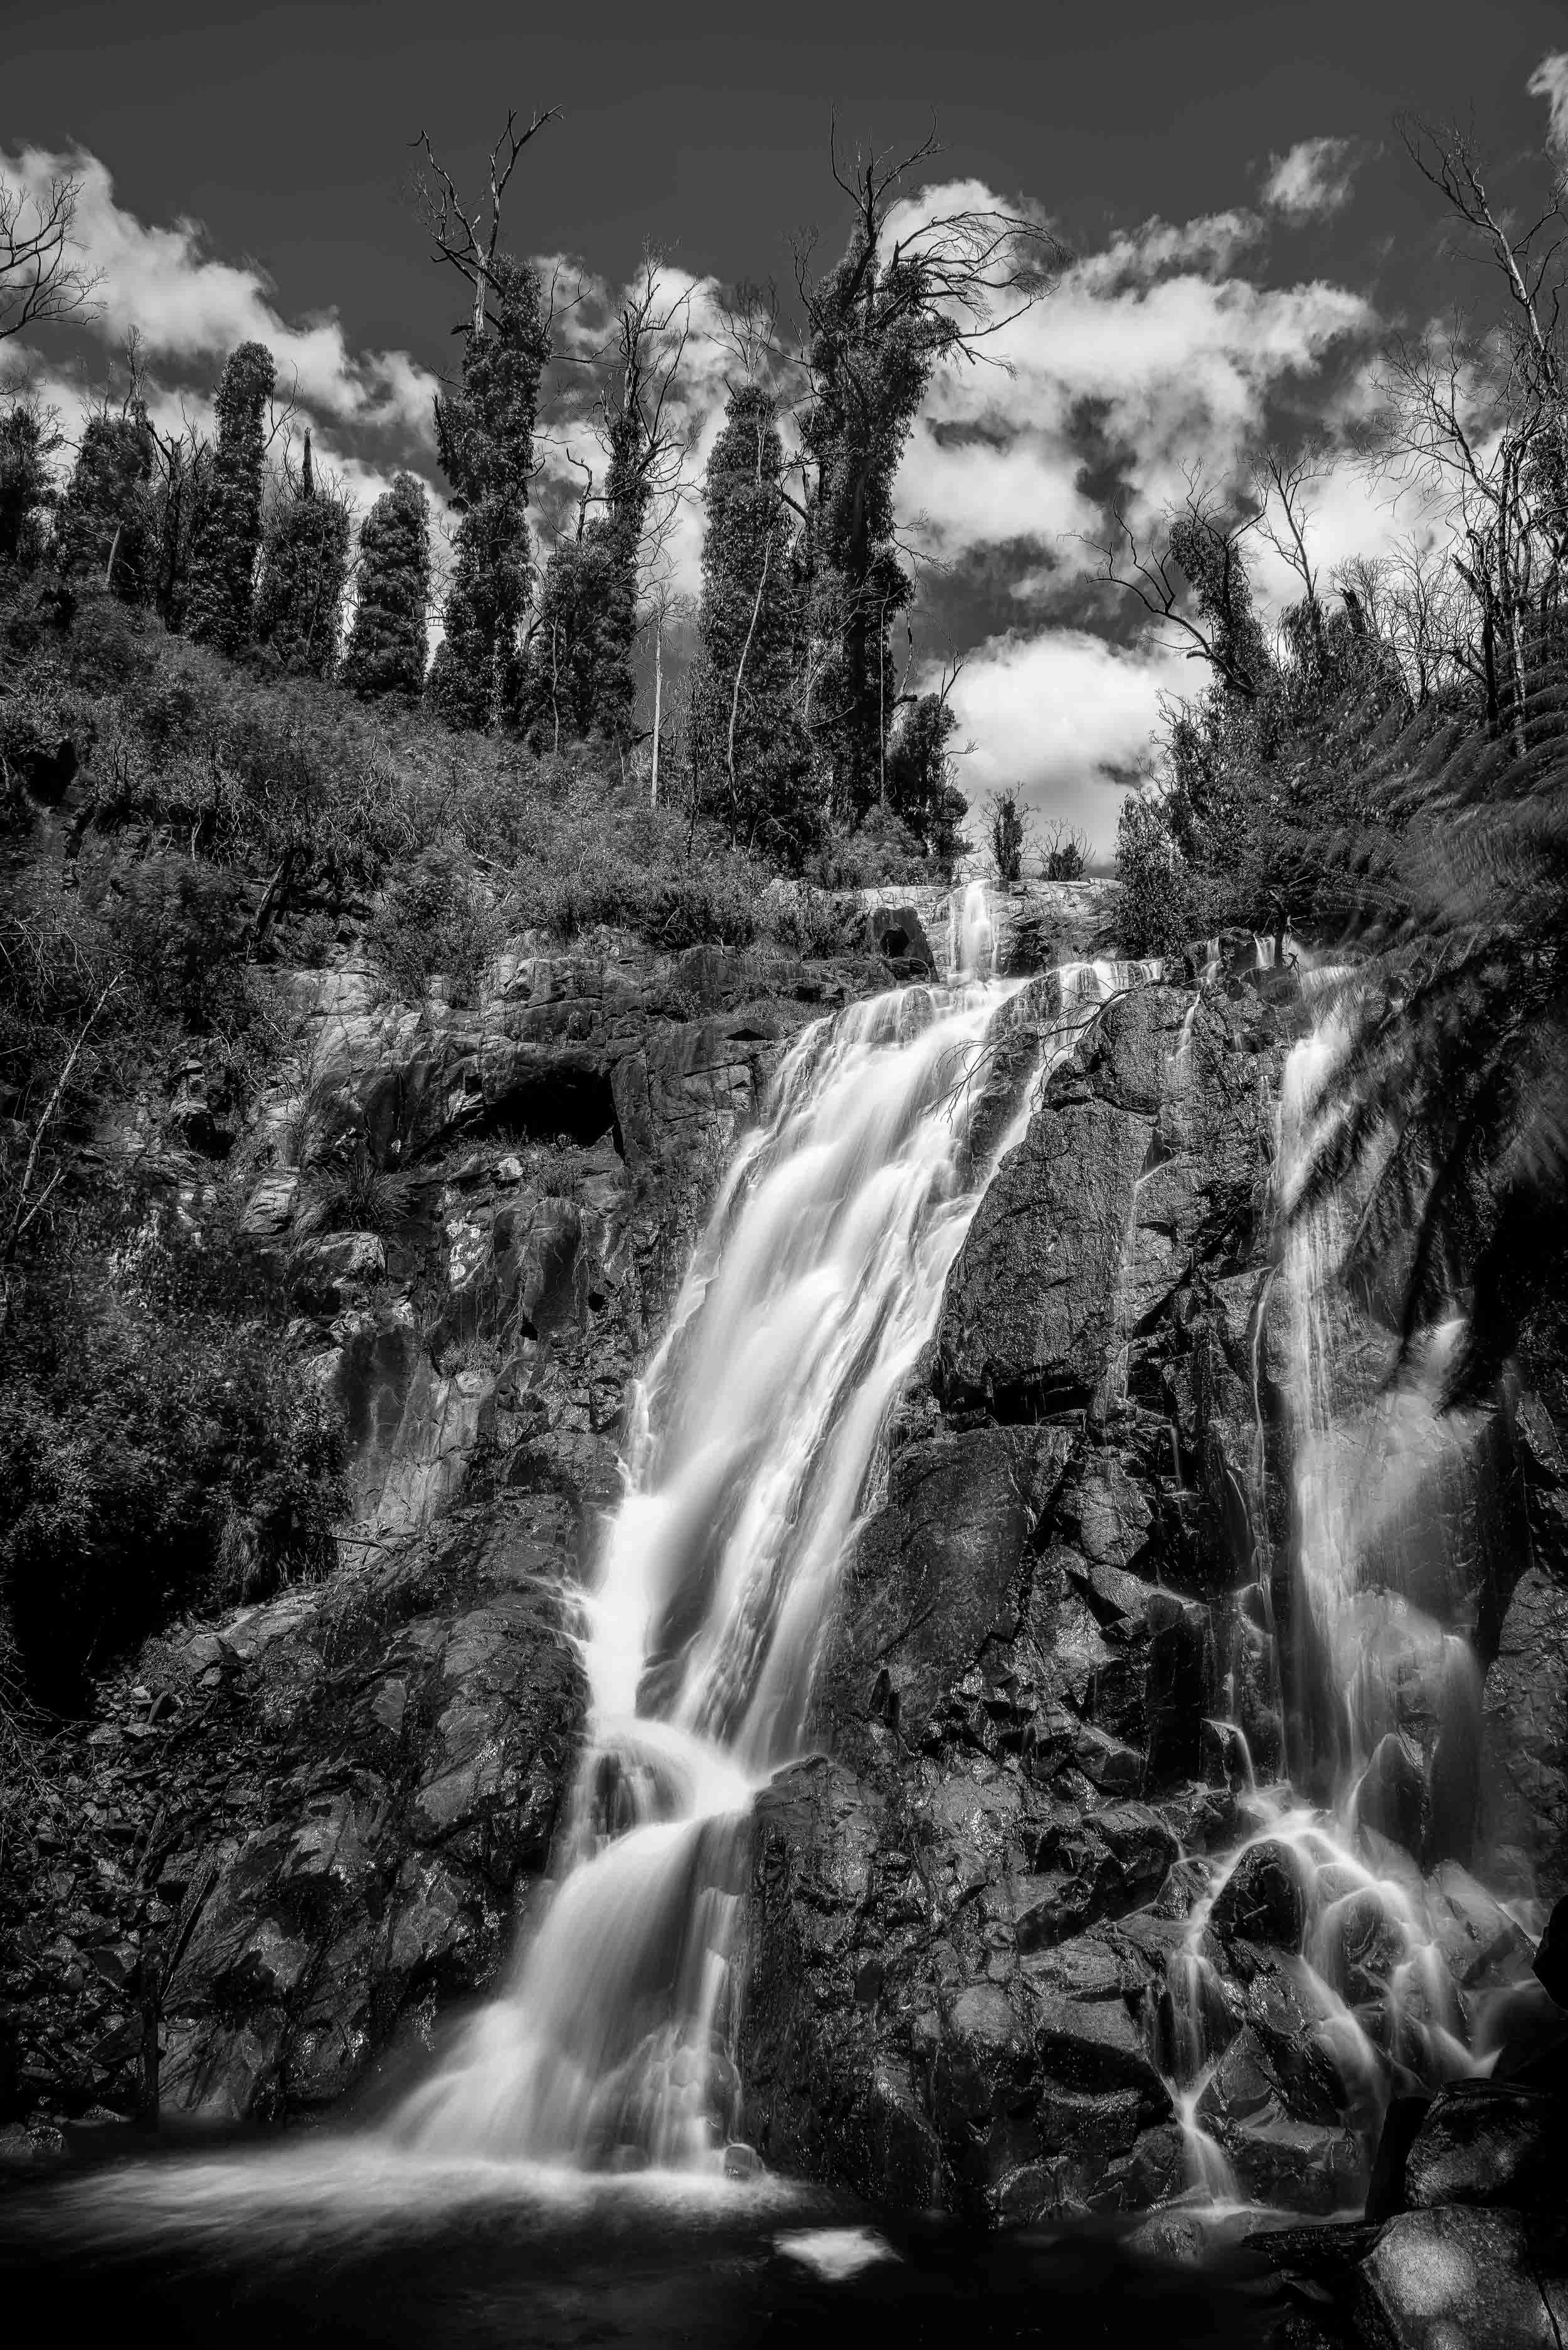
HDR photo of waterfall cascading past church in Bøur, Faroe Islands.
How To Post Process HDR Images
Once the individual camera exposures are combined to create the basic HDR composite image, many folks leave it at that, but I prefer to re-work the new, composite image in much the same way I would a normal, unprocessed file straight out of my camera.
The term HDR has, regrettably, become associated with often pretty tacky looking images. That’s due, for the most part, to overly aggressive post processing.
These days I think it’s got more to do with the so-called awesome presets a lot of folks use to process their photos.
Don’t get me wrong there are some excellent presets out there.
The trouble seems to be that folks either choose the wrong preset for the image in question or consider the preset to be the end of the process, rather than a starting point in a professional post processing workflow.
I prefer a more traditional approach called Tone Mapping. In this case you use software (I mostly use Photoshop, though set to 32Bit) to simply combine the best part of each photo in the HDR series into the new composite image without applying any extra effects.
This approach provides me with a fairly flat looking image that, nonetheless, contains far more information than would be the case with a single camera exposure.
I can then process the image, in line with my own preferences and how the image in question speaks to me, without having adjustments and decisions imposed on me by a preset that's probably somewhat removed from my own personal aesthetic.
On one level it doesn’t matter which application you use to arrive at your result, you just need to be happy with the result you’ve achieved.
However, notions of beauty are not purely based upon your own, personal desired outcome. They are also based upon your audience’s appreciation and, sometimes, their understanding of the methods and mediums associated with your own workflow.
All of the HDR applications I’ve mentioned produce great results. I just prefer to use an application where I remain in control of the process. Though AI is an increasingly important part of a digital photographers workflow, I’m not sure I’d be comfortable not retaining control of the process.
By all means feel good about the results you’ve achieved or what amazing discoveries the process has led you to. Just ensure you’re aware of how far the image has been altered during that process.
The before/after or preview buttons really are a necessary part of post processing an image. Not being aware of your starting point will, more than likely, lead much further from reality than you otherwise would have ventured.
Ensuring you always compare your final image with where you started is probably the best way to determine, prior to publishing and sharing, whether or not the result is somewhat overcooked.
Blue light of dawn on a still morning, Milford Sound, New Zealand.
HDR Technology Should Enhance Not Undermine Your Creativity
What’s important is that photography remains fun and that all the gear, techniques, apps and methods we use serve our own creative intentions.
By all means work intuitively and allow yourself to be taken on a journey. That’s as much a part of the learning process as it is about the creative process.
Just be in the habit of constantly reviewing where your image is compared to where it’s come from (e.g., preview, history, edit/undo and edit/redo).
That tip alone could prevent you from surrendering creative control to a piece of software that doesn’t actually know what (e.g., tree, face, cloud) you’ve photographed let alone how you've responded, emotionally, to it.
The seemingly wacky creative masterpiece Blue Poles by artist Jackson Pollack is undoubtably underpinned by technical discipline and sound aesthetic choices.
The Tone Mapping aspect of HDR provides photographers with a wonderful method by which to produce images from scenes that would once have been considered to be beyond our ability to record in the way we originally perceived them.
With a HDR composite image, containing a far greater dynamic range than was previously possible with a single exposure, our ability to produce images that better represent the original scene and our own creative intentions has been dramatically increased.


How Do You Feel About Making HDR Photos?
I sometimes employ HDR photography when photographing landscape and architecture. How often I employ this technique is dependant upon the scene brightness range under which I’m photographing, whether it’s particularly windy and whether or not I’m using a tripod.
But when photographing backlit scenes, where little or no subject movement is present, my HDR workflow will usually save the day.
Actually I was late to the game, not building this process into my regular workflow until mid 2011.
You know, old dogs and new tricks.
But, as you either have or will likely discover, once you start working with HDR Photography there’s just no going back.
The technical advantages and creative freedoms HDR offers are simply amazing.
The fact is that I never really considered HDR to be foreign or, somehow, outside of photography practice. It’s really just another tool, another step in the creative workflow.
The only reason I mention it here is for those folks who either don’t know about it or are having trouble implementing it.
The fact is that, while HDR is a new world for many, it’s really quite a straightforward process to implement. One you might like to investigate further.
As always, I’m here to help you along the road as you continue your own creative journey in photography.